如果你像我一样使用 Promox 的 AMD 处理器 并且不能添加温度监控,那么你很幸运,只需按照我下面的操作进行,应该就可以实现对AMD的处理器进行温度监控。
- 首先,你需要安装一些依赖包
apt-update && apt-get install lm-sensors -y
现在,我们需要修改一些文件。稳妥起见,建议你先备份这些要修改的文件,以防万一。
2. 编辑文件: /usr/share/perl5/PVE/API2/Nodes.pm
寻找关键字 $dinfo ,他差不多在行数为 364 左右,像下面这种类似的:
$dinfo = df('/', 1);
然后在这一行后面增加下面的代码:
$res->{CPUtemperature} = `sensors`;
$res->{Nvmetemperature} = `sensors`;
3. 下面一步, 编辑文件: /usr/share/pve-manager/js/pvemanagerlib.js
- 搜索关键字
height: 300然后帮他改成height: 420 - 寻找关键字
pveversion, 他差不多在行数为 34827 附近, 然后像下面这样增加代码:
        {
            itemId: 'CPUtemperature',
            colspan: 2,
            printBar: false,
            title: gettext('CPU Temperature'),
            textField: 'CPUtemperature',
            renderer: function(value){
                const regex = /Tctl:\s+([-+]?[0-9]*\.?[0-9]+)/;
                const match = str.match(regex);
                const temperature = match ? parseFloat(match[1]) : null;
                return ` ${temperature}℃`;
             }
        },
        {
            itemId: 'Nvmetemperature',
            colspan: 2,
            printBar: false,
            title: gettext('Nvme Temperature'),
            textField: 'Nvmetemperature',
            renderer: function(value){
                const nvmeTemps = Array.from(value.matchAll(/Composite.*?\+([\d\.]+)?/g), m=>m[1]);
                return "Nvme: " + nvmeTemps.map((element, index) => `${element}℃`).join(' | ');
            }
        },
4. 重启服务
systemctl restart pveproxy
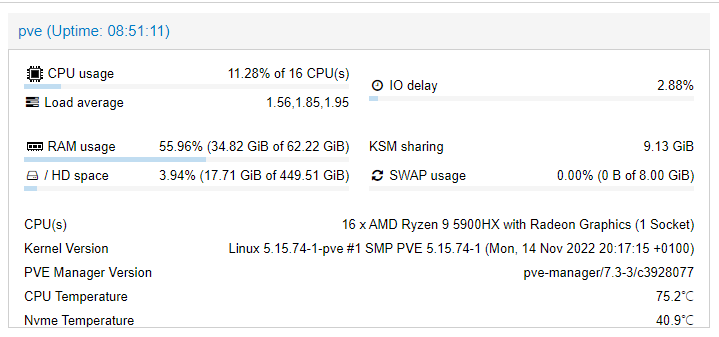
5. 刷新浏览器来查看结果
参考资料:
https://medium.com/help-14/add-amd-cpu-gpu-nvme-temperature-monitoring-to-proxmox-7-a95147df71cd